When the big yella bike found me, in 1999, she was tricked out with just about all the Hondaline accessories available for a 1997 Honda Valkyrie, including a pair of spacious leather saddlebags. Those bags served us for well over 180,000 miles in the following years. My only complaint was that I could never really get them waterproof. Though I used seam sealer and oiled the bags the seams on the lids always ended up leaking. This may be what prompted me to rescue an old set of fiberglass bags and top box when a brother cleaned out his shop prior to a cross-country move. These same bags sat in my “pending” pile for a number of years till the leather bags began to need repair that I’m not equipped to perform. This isn’t to say that I’m qualified, in any way, to alter antique fiberglass bags but, “ Nothing ventured, nothing gained”, the saying goes.
The bags, believed to be Bates brand, were built with a curve in the inboard side.

My aim was to alter the shape and scrap the locks and original hardware. I began by cutting out the bulge with a saber saw. Then, drawing on lucid moments from a long-ago college sculpture class, I created an armature of rabbit wire and began applying fiberglass to create the new flat side, repeating the process on the tops.


I attached sheet metal to the mounting surface to insure waterproofing and guard against cracking, then hinged the lids on the outside so they would open away from the bike. I smoothed the inside of the tops as best I could and shot them babies with rattle can “etching primer”.

The primer was probably an unnecessary step but it made correctable flaws easier to see.

A wise man told me that you could accomplish any task if you have the proper adaptor kit. Since I was determined to use the sturdy Hondaline brackets that mounted the old leather bags, and since there was no prefabricated adaptor kit, I had to devise my own using the empirical method (trial and error).

Spray can truck bed liner was to be the final finish so they were coated, inside and out.

The lights that had been on the bags were long gone but, if I had to, I’d guess they had been the type better suited to a boat trailer than a motorcycle. You know what I mean.
Now, the shape of the saddlebags and the pre-cut holes cried out for flush-mount lights and I thought that could be accomplished if I could wrangle some flat lenses. The long an short of the matter is, our good brother, Hagen, who’d donated the bags, also donated 2-inch yellow lenses for the project

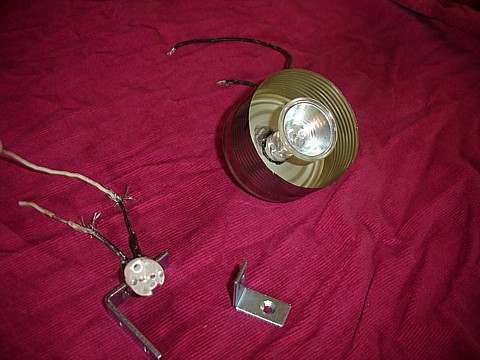
I had been using small bullet lights with 25-Watt lamps as turn signals on the big yella bike. I wanted that kind of wattage for the new turn signals but couldn’t find a suitable bracket to mount the lamp socket.
[Deleted: Tiresome self-aggrandizement (patting my own back) for being a super genius]
I wired the lamp sockets inside tomato paste cans. The cans were shortened in attempt to place the bells of the lamps against the yellow lenses to prevent them from being jarred out of the socket.


I added a couple of corner brackets with which to attach cans to bags and, zip-pop, I was in business.

Each hole left from the lock removal was filled with a red LED; wires to power it and the turn signals were neatly secured to the saddlebag mounting brackets.
Time for a road test.
While riding at 75 mph, into a 40 mph wind, I discovered that I needed some way of securing the lids against blowing open. After a little trial-and-error I settled on tie-downs made of industrial strength hook and loop material, not as groovy as my original design, but certainly effective.

These fiberglass bags are slightly longer and wider than my old leather ones, taller, too, because of the design of the lids. Even with the tin can light fixtures I have more storage, but I’ll know if the project’s primary goal was met the first time I ride through heavy rain.

The road goes on forever.
